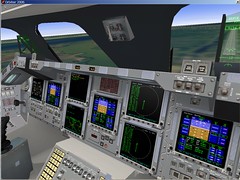
A patch for Orbiter 2006 was released today with a number of new features - see www.orbitersim.com for details of what was added and (free) download information.
One really nice feature is an enhanced 3D model of the shuttle Atlantis, including a more detailed virtual cockpit (VC) with multiple functioning MFD's (display screens for instruments as shown above). Cool.
A minor feature that I really like is the ability to add camera position control to flight recorder playbacks. This is really great for "hands off" demos. I was on the beta team and was able to add camera presets to two of the tutorial replays in time for Dr. Schweiger to include them in the patch release. These are "Atlantis Final Approach" and "Smack! Rescue." If you run these scenarios, the "camera" will switch to different external and cockpit views (set by me) depending on what is happening in the playback. For example, I switch to an underside view to see the landing gear come down when Atlantis is about to land, then to a fixed ground view next to the runway for the touchdown and roll-out.
NOTE: The following is NOT typical "Orbiter stuff" which is mostly done with the mouse and keyboard in a 3D view. This is more or less "advanced" use of a new feature that requires editing some of the files from a recorded flight. You don't have to do this at all!
To add camera presets to your own playbacks, you need to do two main things, both after you have recorded the flight (this assumes you are a bit familiar with scenario files which you will need to text edit). First is to play it back (maybe at 0.1 time "slow motion"), change to various views you wish to use, and save each of these views as a "preset" in the Control-F1 (Views) dialog. Save this scenario file, quit Orbiter, open the saved file with a text editor, copy the "BEGIN_PRESET - END_PRESET" section of this file, then open your recorded .scn file (it will be in the Scenarios\Playback folder), and paste this block into the BEGIN_CAMERA section of that scn file, and save that file. Note how many presets you have saved - you will later refer to them by number starting with zero.
Now go to the /Flights folder (in your Orbiter installation folder), and find the subfolder for your recorded flight (its name will match your recorded .scn file). Find the .atc file for the vehicle you wish to control camera views for, and open it with a text editor (it will be a file like sts-101.atc or gl-01.atc). The .atc file lists mission times (seconds) and various recorded actions such as HATCH OPEN and GEAR DOWN and ENG (engine events). You can insert new times (keep sequential order) with the command CAMERA PRESET n where n is the number of one of your saved preset camera views. For example
22.3 CAMERA PRESET 2
will switch the view to whatever preset-2 is (the third one you saved) at 22.3 seconds into the playback.
Sorry if that sounds complicated! It's really just editing a couple of text files and following the steps. The tricky part is to define good camera views and then to apply them at the right times to see something cool happening in the playback. Take a look at the two supplied examples and you'll see. But remember, this is a specialized thing, not typical of using Orbiter or necessary at all. If you are new to Orbiter, play with it a while before you try this. That's a lot more fun for starters.
No comments:
Post a Comment